Debunking myths on genetics and DNA

Showing posts with label Photography. Show all posts

Tuesday, August 12, 2014

"It's in post that you can bring out your true vision": award-winning photographer " talks about his work, his passion, and the true value of post-processing

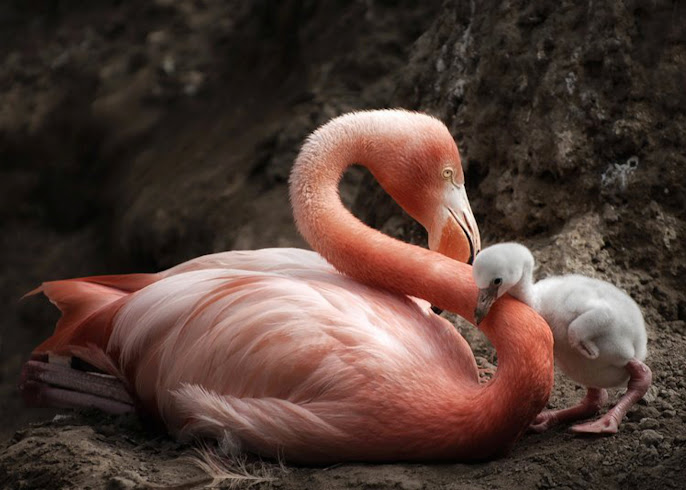
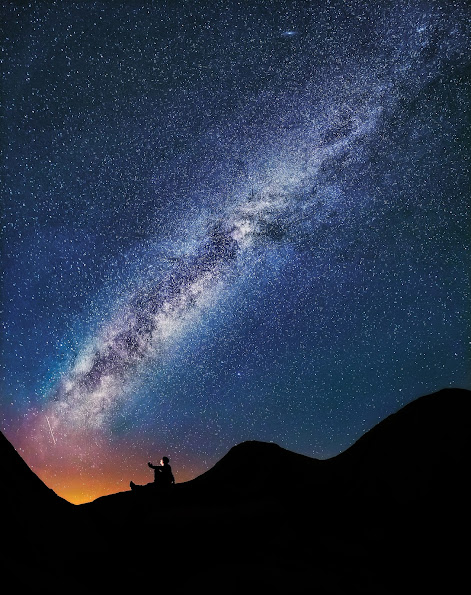
"Eternal Flux" © Sairam Sundaresan

A couple of weeks ago I posted a pseudo-tutorial on textures and said how textures can turn a landscape shot into a "story-telling" shot by evoking a different set of emotions. This reminded me a of a great photographer I met through G+, Sairam Sundaresan, and his G+ mentorship titled Storytelling Landscape Photography.

Sairam's work is outstanding and mind-blowing, and if you haven't seen it already, you should. Last year, Sairam won 12 Honorary Mentions at the prestigious International Photography Awards, and this year he was just recently awarded First place in the PX3 2014 contest in the Nature/sunset category with his image "Apocalypse". That's why I'm so excited to have Sairam here at the blog today, to share a few tips and secrets about his work. Welcome, Sairam!

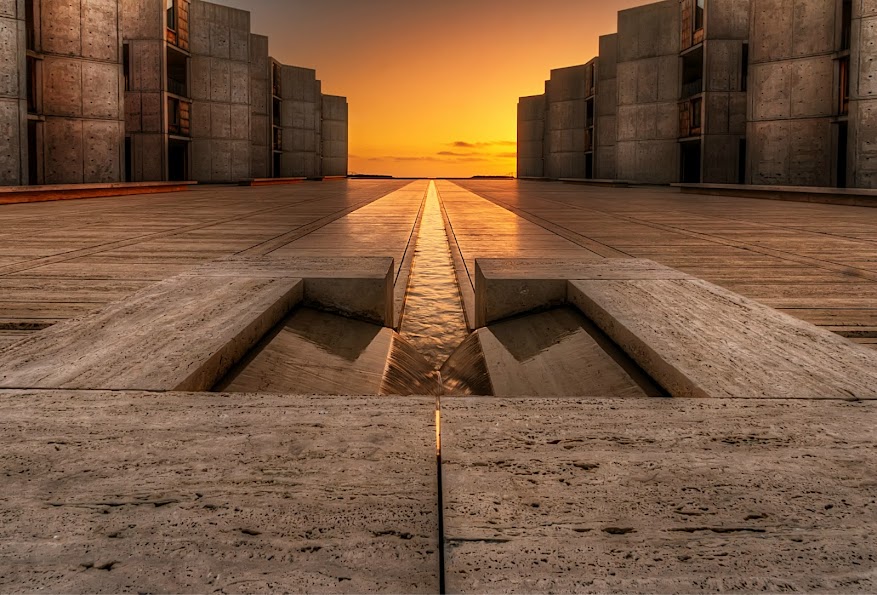
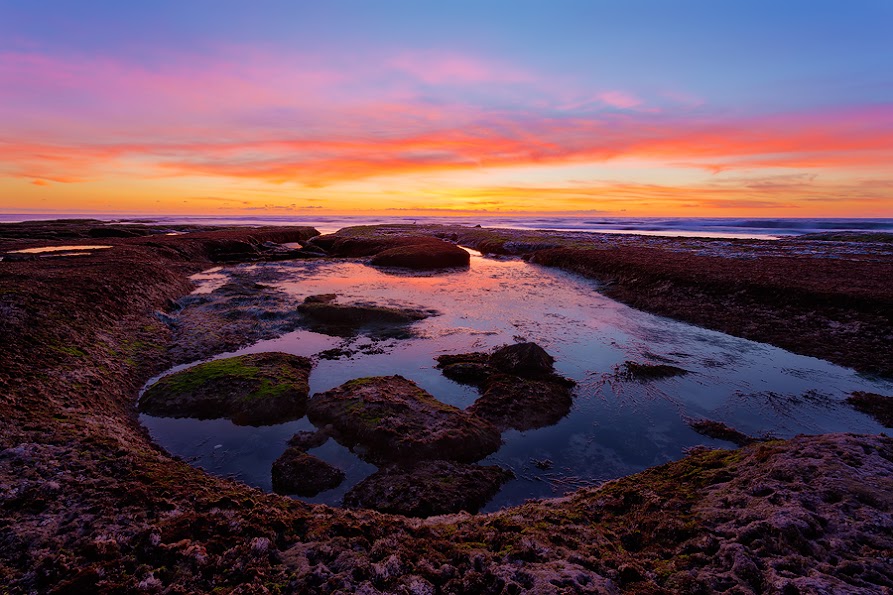
"Apocalypse" © Sairam Sundaresan

EEG: Tell us a bit about your background and how photography has become your passion.

SS: Well, I'm basically an engineer by day and a photographer by night. Growing up by the coast, I'd often visit the beach. The cool waves, the colorful sky, and the glowing sand used to excite me every single time I went there. My parents had a nice kodak camera when I was a kid, and I used to play around with that. Given that it was a film camera, I'd have to be careful with how many shots I took before a new roll was needed (I ended up using a lot of it!). Rest assured all the family portraits I took had the background landscape in sharp focus and my family all blurry. Little did I know then that I would pursue landscape photography as a serious passion. In college, all my friends jumped onto the DSLR bandwagon. I didn't quite know what the fuss was about, but I saw their pictures and wondered how they managed to get such high quality images. Without a second thought, I invested in a Canon Rebel Xs, and started pressing all the buttons on it. At first, all I did was shoot in one of the auto modes. While the pictures I took looked nice, I didn't quite feel happy about them. There wasn't this sense of "creation". One fine day in late 2011, I decided to switch to manual mode, and there started the journey. I made a ton of mistakes, but never stopped shooting. I used to pore through blogs, videos, and books on photography and glean as much as I could. Somehow, reading was never as good a teacher as actually going out there and shooting. While looking through my collection of images, I realized that most of my subjects knowingly or unknowingly belonged to the natural world. Fast forward three years, and I have never felt more excited about shooting my next landscape image. I guess nature gives me a sense of peace. When I am out shooting in the wilderness, there's a sense of connection that I experience with the whole world that I quite don't find anywhere else. Alright, I'll stop now before this becomes a novel.

EEG: When you set off shooting, how do you choose the perfect spot? In other words, what factors come into play: angle, light, framing ... ?

SS: I strongly believe in preparation. Mother nature is extremely talented at throwing curve balls at you, so the more prepared you are, the more you can embrace the moment and capture what you experience. With the evolution of technology, we've been blessed with several tools that help us prepare and plan way ahead. If I'm visiting a spot I've been to many times, I first focus on weather conditions. Natural light changes dramatically based on weather, and I try to pre-visualize what kind of light I may have at the scene based on the weather. Say it's the coast that I'm going out to shoot. I look at the tide charts. High tide and low tide offer completely different opportunities. By knowing how the tide would behave, you can have a sense of opportunities that will be available for you. For example, in low tide, you could have the possibility of reflective sand, since the water washes through the sand and recedes. This allows for symmetric compositions where the sky can be seen in the sand. Next, I look at the google maps for directions. If I had a nickel for every time I've lost my way to a scene, I'd be richer than Warren Buffet. Knowing where to park, how much traffic there will be and most importantly how to get to the place will save you valuable time that can be better invested in searching for good compositions. Now if it's a place I've not been to before, I search online for images of that place to see what opportunities are available. I don't try to "learn" compositions from these images that I could use at the scene, but rather get a sense of light direction, foreground elements, etc. I also look at google maps to see how the terrain is to find out more opportunities. At the scene, I like to take my time to find nice compositional elements to incorporate into the shot, so I usually get there ahead of time. Once I've found some interesting opportunities, I wait for the right light. Without good light, even great compositions fall flat. I like to find some elements that tie everything in my shot together. It may be things like colors reflected in the foreground, or shapes that the clouds and the foreground elements share and so on. Most importantly, I believe it's important to keep an open mind while shooting and embrace any opportunity that comes your way. Trust your gut. If there's something that made you stop in your tracks and take notice, there's probably something worth shooting there.

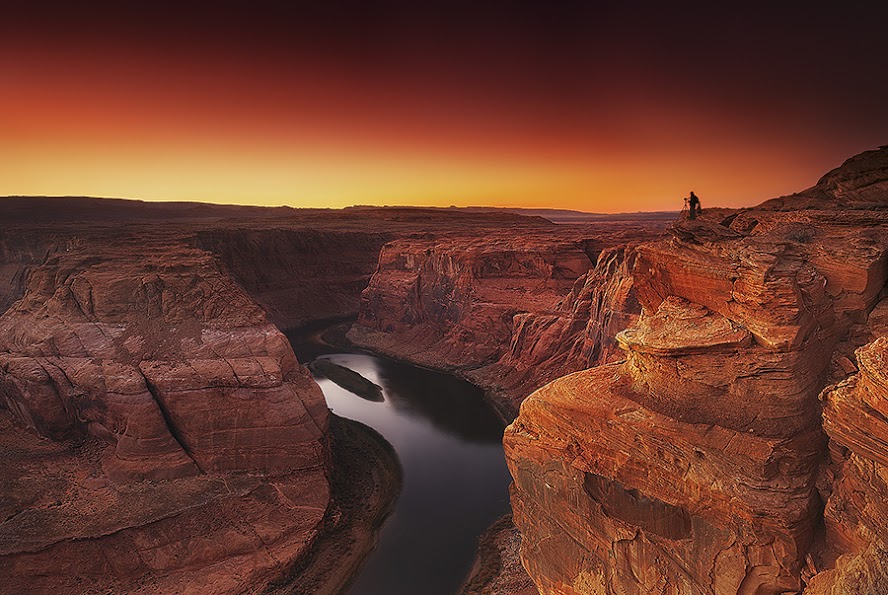
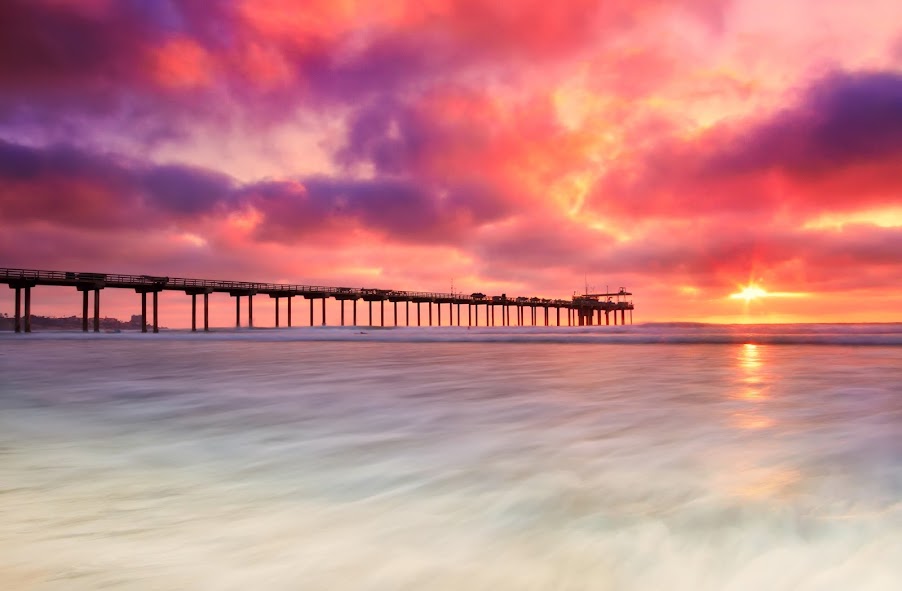
"Shine on You Crazy Diamond" © Sairam Sundaresan

EEG: Tell us about the G+ mentorship. I love the idea of story-telling through landscape photography: how do you go about doing that?

SS: Google+ has been a real blessing for me. I've been able to connect with so many world class artists and learn from them. It's a platform where inspiration is available for free. One such artist whom I owe a lot to is Robin Griggs Woods. I got the chance to participate in her mentorship at G+ and my eyes were opened. What really touched me was the fact that Robin taught so many amazing things for free. Look around anywhere else for this kind of knowledge and you'd be asked to pay out big bucks. I felt it was time for me to give back to this nurturing community, and that's when the idea of the "Storytelling Landscape Photography" mentorship came about. I approached Robin with this idea, and she graciously accepted my request to teach. With her guidance, I prepared a 12 week program which covered things from basics to a little more advanced tools in landscape photography. I wanted to make this knowledge available to anyone who was interested, and I didn't want people to go through the same "Search and hit a brick wall" routine that I went through. I put out a post on G+ announcing this mentorship, and nearly 100 people signed up. I had a really hard time culling down the list to 27 people. I also had the help of some amazing friends I "met" during Robin's mentorship in running the actual mentorship. They'd comment, inspire and help out the "mentees" when I wasn't there. In the end, I ended up learning a lot from these amazing people, and they inspired me and my work in a big way. The goal of the mentorship was to provide each participant with the tools to tell a compelling story. Without a story (literally or in a more abstract sense), a landscape image wouldn't have much visual value. I'm delighted to have been able to offer something small back to the community, and hope to offer it again in the near future.

EEG: What do you value more, in-camera work or post-processing? (I'm guessing it's a mix of both.)

SS: You guessed right! :) It's definitely a mix of both. I'd add one more thing to it, "Vision." A great image is an equal combination of Vision, technique in the field and post processing. Knowing what you want to shoot, pre-visualizing an idea really helps focus your energies in the field. Developing a vision is probably more difficult than actually shooting, and processing an image. With the right vision, it's important to capture the scene in the way that will best bring out this vision. For this, proper technique is essential. Ensuring the image is well focused, properly exposed, and has a powerful composition all give you something worth working on in post. Finally, post-processing is just as important as technique. A lot of people say, "I believe in Straight out of Camera shots." Even there, the camera actually does the post processing for you before it saves the jpegs. I really feel that it's in post that you can bring out your true vision of the scene. Learning good post processing can make a good image a great image provided the RAW file you started off with had the first two elements I spoke of. To conclude, I'd like to show viewers how a place 'feels' like and not how it 'looks' like.

EEG: I really love that, the "feels like" rather than "looks like." That's exactly where the creativity comes in, otherwise the camera would be a mere "recorder", instead it's a medium, just like oil paints and watercolors.

Thanks so much for being with us on the blog today, Sairam!


SS: Thanks a bunch for interviewing me Elena!

Check out Sairam's portfolio for more outstanding eye candy, and don't forget to add him to your circles if you're interested in his next G+ mentorship.

Wishing Well © Sairam Sundaresan
Eye of Mordor © Sairam Sundaresan
"All Roads Lead Home" © Sairam Sundaresan
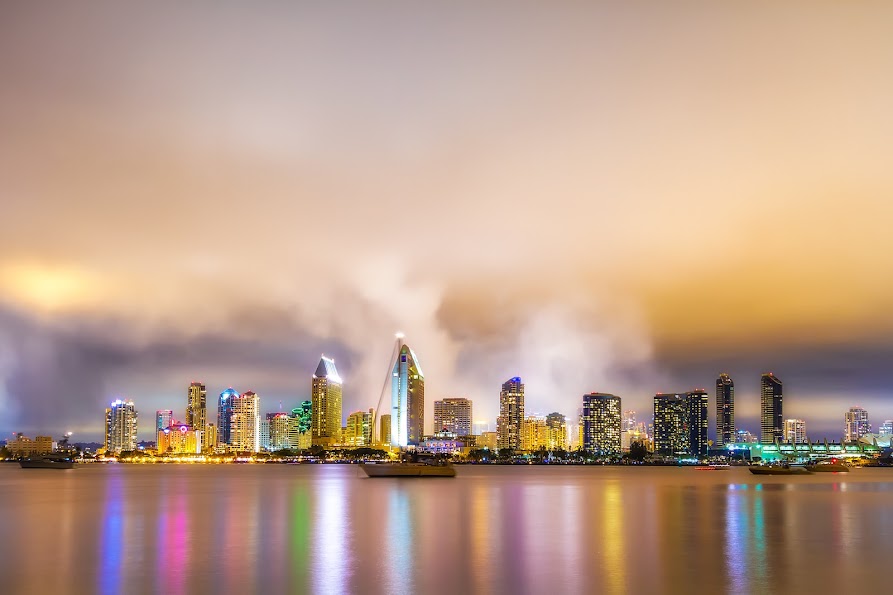
Big Bay Boom © Sairam Sundaresan

Thursday, July 24, 2014

The appeal of textures (an improvised tutorial)


Memories © EEG
Reaching for the Sky © EEG
Gratitude © EEG
I just got back from a trip to Europe, where I definitely re-bonded with my camera. One thing I discovered in this trip are textures. I'm really grateful for photographers like Karen Waters (I used one of Karen's textures for the image in the middle, Reaching for the Sky), Joel Olives and Brooke Shaden, who are so generous to regularly share their textures (check their websites to see what awesome textures they have!), and I've been thinking for a while now to start making my own library of textures and sharing it. And this trip gave me the opportunity: you wouldn't believe how rich in textures old Europe is! But before we get into that, I wanted to also share a few things I've learned about textures.

What are textures?

A texture is a layer that you overlay to a picture to give it a special mood and/or vintage feel. In my experience, old walls are the best candidates for textures. A texture also helps blending when compositing several pictures together.

Why use textures?

I personally use textures when I want my picture to convey certain emotions. Another super talented photographer I follow is Sairam Sundaresan, who teaches a G+ mentorship titled "Storytelling through Landscape Photography." While I haven't been able to attend his mentorship (shame on me!), the title has always intrigued me. (On a side note Sairam shares lots of tips on landscape photography in his blog). How do you tell stories with just a landscape? Over this last trip I learned that in order to make an image that is not only beautiful, but also tells a story, you have to shoot your subject in a way that it poses a question and/or captures a particularly emotional moment. I also learned that textures can definitely add, and even change, the emotional appeal of the image.

The pictures I posted above are an example. Each image above is trying to convey a sense of suspension in time and, hopefully, raise a question in the viewer and a bit of wonder. I believe the same images, without the overlaying textures, would not achieve that.

And now to the key point: How do you use textures?

I am a self-taught photographer, so I'll share the textures I've shot and my own way of using them. You can download a set of 30 textures I collected from various parts of Italy and Scotland from this public album. Please use the textures for your own work and, like all of my images, keep in mind that these images too are to be used in agreement with a non-commercial creative commons attribution.

These textures are "raw" and minimally edited. This is because I like to edit them after I overlay them on the image I'm working on, not before. Every image is different, and the same texture can be edited in different ways according to the image I'm making. Specifically, here's what I do: I pick a texture that I believe will work with my background image. I make the decision based on color (I choose a palette that enhances the base image; for example a pink/orange for a sunset, green for foliage, etc.) and lighting (I ask myself: where do I want the highlights to be?). Because my textures are quite rough, once I overlay them (in Photoshop Elements, just copy and paste the texture as a new layer, then choose blending mode "Overlay"), I usually add some degree of gaussian blur to smoothen them and make them blend onto the base image better. This is done by clicking on Filter -> Blur -> Gaussian Blur. Next, I look at the overall feel of the image. If the texture is too much, I decrease the opacity a bit. If there are areas that are too patchy or where the texture feels like it's adding noise, I blend it down with the clone stamp. And if the image doesn't feel quite done yet, I add another texture. It's all really about playing around with your image until you get a result that you like.

What about you, do you enjoy using textures? And if you do, how do you use them?

Feel free to download the textures from my album and if you do use them, come back to show me the result! :-)

Saturday, May 3, 2014

Bug shooting tips from macro photographer Shane Williams, a.k.a the "Bug Whisperer"

He's the "Bug Whisperer" over on G+, and if you haven't seen his beautiful work yet, you should. Here's a sample of what you've been missing:


Based in Adelaide, Australia, Shane Williams is a fantastic macro photographer who specializes on shooting insects. You can find his work also on Flickr and 500px.

Today Shane is my guest here on CHIMERAS to teach us some of his "tricks of the trade" on how to shoot bug macros. Welcome, Shane!

EEG: First off: why do you shoot mostly bugs?

SW: I've always been interested in nature and animals and enjoyed trying to capture these subjects even early on when I owned point and shoot cameras. Also, being a bit of a tech nerd I’m very interested in the detailed specifications and capabilities of cameras as digital technology advances.

I progressed to owning Canon Powershot models which were great all rounder cameras as they had some of the longest zoom ranges in the prosumer market yet also had the ability to focus to 0mm (meaning you could actually put the subject against the front glass of the lens and the camera was still able to focus on it)

I suppose I've always been drawn to capturing things not viewable to the naked eye whether this be at the extreme zoom range or the opposing macro end and as I started playing around with shooting macro images I became more and more fascinated with the details the images unveiled.

The more proficient I became with the technical aspects of capturing living subjects the more the feeling of awe and fascination grew for me as more and more details I was previously unaware of and had never seen became viewable in the shots I was capturing. The complex structural anatomy and beauty of Arthropods when seen at lifesize or greater magnifications was giving me an insight into a whole new world and multitude of complex micro ecosystems that many people are either unaware of or completely take for granted.

I was fascinated that all this could be occurring in a single bush in any residential street front garden! I began to find it extremely challenging  to shoot moving live subjects and once again dived into the technical aspects of how to achieve sharp, well composed, well lit images now leaning more toward not only producing an acceptable image but also striving to give it some artistic merit as for me it was also very important not only to try to capture good images but also present them in a way that to a casual observer or someone who may have a natural aversion to Bugs or Spiders etc may gain a new appreciation for them through my images.

In essence macro photography of Arthropods is exciting to me on many levels, from the technical aspects of producing a good image, to the primal instinctual urge that’s satisfied by “stalking, hunting” and coming to learn the habits of you “prey” and an ongoing desire to expose these lesser known species to people in the hope that they gain even more of an appreciation for their place in the natural world.

EEG: You've recently acquired a Canon MP-E 65mm, which is a very unique lens that can enlarge a subject up to five times. Such amazing technology comes with a shallow depth of field and other difficulties that one has to overcome when using it. Before you had this lens, you were shooting macros using a 50mm lens fit with extension tubes. Can you compare the two set-ups? What are the pros and cons of each?

SW: I initially started shooting macro with a 50mm1.8D prime lens on a set of Kenko extension tubes, later on progressing to dedicated macro lenses and finally to a specialist lens the Canon Mp-e65mm. Both set-ups provide extremely sharp images, as the Mp-e is essentially just a 65mm prime lens reversed with bellows built in anyway so the glass on both lenses produces exceptional sharpness. The advantages of the 50mm on tubes is of course price, coming in at less than a quarter of what an Mp-e will set you back.

You also have more flexibility at the wider end with the 50mm as you can go from infinity without any tubes up to 1:1 or greater by adding \ removing tubes or other methods whereas the Mp-e being a specialty macro lens designed for very close up photography starts at a magnification of 1:1 and moves in to 5x. With many larger subjects such as Butterflies, Dragonflies, larger Spiders etc you cannot even fit the entire subject in the frame at 1:1 so you’re left trying to compose an interesting shot from a partial body image or not bothering to shoot the larger subject at all with the Mp-e. While at the wide end the Mp-e can be limiting, there’s nothing that compares when it comes to magnification capabilities as the lens extends smoothly from 1x to 5x magnification retaining the same sharpness throughout.

The most important factor when shooting any image of course is light, and this is no more apparent than in macro flash photography. Trying to achieve fast enough shutter speeds to freeze moving Arthropods while using small enough apertures to provide adequate depth of filed (extremely limited due to the magnification in macro shooting) is almost impossible without using a flash to provide additional lighting. They key to sharp well lit macro images is to have your light source close enough to your subject to provide the shortest burst of light possible (the light emitted by your flash becomes your effective shutter speed, so the quicker the better) while also producing well diffused lighting without blown out highlights or bright spots in the image.

This is very difficult to do and there are very few specialty retail solutions available to help, so many times customised options are the only way one can achieve good results. There is a specific twin head flash unit called the MT24-ex manufactured for the Canon Mp-e65mm (it also fits the 100mm macro) which clips onto the front of the lens allowing your light source to travel with the lens as it extends (the Mp-e extends some 5 inches as you progress through the zoom range) which is invaluable as little adjustment is required whether you are shooting at 1x or 5x. It is again a very expensive piece of kit costing almost as much as the lens itself and still needs a lot of customised diffusion before it produces pleasing light but it’s the best light solution I have used for macro yet.

This is another advantage of the Mp-e as there are no equal solutions for a tube set-up and much more customisation is usually required to produce a flexible lighting solution. In summary if price is the main focus and an Mp-e set-up is out of the budget range great results can be achieved with a 50mm on tubes option as long as you can manufacture a suitable flash solution to light your subject.

I would also recommend a 50mm on tubes if your interest mainly lays in larger subjects or farther out compositions and a lot of flexibility at that wider end. (although not technically “macro” as macro means an image at lifesize “1:1” or greater, many people shoot at this “close up” range for the bulk of their shots). I would only recommend the Mp-e lens for someone who is an experienced macro shooter who’s already used other set-ups and wants to be able to produce images greater than 1:1 magnification and can afford to buy not only the lens but again a lighting set-up that will do it justice as well.
It can be a very challenging lens to use, is very expensive, and is limiting at the wide end, but no other lens gives you the flexibility to zoom all the way from 1x to 5x on the fly and produce as sharp images when handled well.

EEG: What kind of flash set-ups do you use and what do you recommend in particular for macro photography?

SW: Specifically regarding the flash set-ups I use there are a few variations depending on which lens I’m using at the time and the subjects \ conditions on the day.

As the subject is so close to the lens in macro photography you don’t need a very powerful flash to provide sufficient illumination for good exposure, so smaller and (sometimes!) cheaper units are adequate. For the Mp-e65mm I prefer the MT24-ex twin head solution and have put a lot of work into making customised diffusers which fit onto the flash heads to diffuse the light as well as possible while still retaining fast enough shutter speeds and decent contrast in the image.
When shooting with tubes or other macro lenses on my Nikon bodies I just use the smallest cheapest flash available from Nikon, the SB400.

I diffuse this with either cone shaped diffusers I place over the flash head or with pop up fabric diffusers I hold in front ot the flash which allow me to angle the light and adjust the distance between light source, diffusion, and subject for different results. The requirements for macro flash photography aren't too different to the main elements in other styles. Try to provide good levels of light for a well exposed image without blown out highlights, bright spots or harsh shadows.

As long as you can produce light preferably at a close distance to the subject to shorten the effective shutter speed (and also conserve power out put meaning faster refresh times and longer battery life), it really comes down to diffusing the flash to produce the light you find most appealing for the subject you’re shooting. Arthropods vary substantially in their reflectiveness as well, so things like Butterflies or Spiders you may find you can diffuse the light less and retain more punchy contrast but when faced with things like Lady Bugs or Ants which are smooth and highly reflective you need to add diffusion so as not to produce very harsh hot spots in the image which can be albeit impossible to rectify in post processing.

A quick Google of “macro flash diffuser” on the web will provide countless examples of options for flash diffuser designs and a lot of trial and error is usually required before you get the results you’re after. I have been heavily influenced and inspired by many shooters along the way and only hope I can do a portion of the same for other’s looking to get into macro photography in the future. I have gleaned countless pieces of great advice and guidance from people like Mark Plonskey, John Kimbler, Popumon Papulop and others through their writing, comments, and by observing the images they produce. I think it’s one of the most important things you can do no matter what you choose to shoot: be humble, always learn what you can by looking at other peoples work, always be a student and realise how far you have to grow,challenge and push yourself to progress, create, and push your boundaries as an artist.

Most importantly have fun!

EEG: Thanks so much, Shane, for sharing all these tips with us today! And yes, having fun is indeed the most important part. 

For more eye candy from Shane, check out his fantastic galleries on on Flickr and 500px.

Monday, April 7, 2014

Priceless advice from award winning photographer Laurie Rubin: "Photograph from your heart, not your head. It will show in your images."

A picture is worth a thousand words, and that's why instead of telling you how excited I am about my guest today, I'm going to show you through a sample of her work.

A Little Tenderness © Laurie Rubin

Run For It © Laurie Rubin

The Dreamer © Laurie Rubin

Award-winning photographer Laurie Rubin captures wildlife like no other: just look at the tenderness between the flamingo mom and her chick -- it's priceless! The image placed first in the "Best of Nature" award, while the following tender moment between a mother gorilla and her baby:

Read to your kids © Laurie Rubin

was the 1st Place Category Winner for the Windland Smith Rich International Award and is currently displayed at the Smithsonian Natural History Museum.

EEG: Congratulations Laurie, it's such a great honor to have you here on CHIMERAS today!

Tell us a bit about your background and how you discovered photography as your passion: if I'm not mistaken, you started as a computer artist, correct?


LAR: I started right out of college after graduating from San Diego State with an emphasis in Graphic Design as a Computer Artist, creating presentation graphics and training for large companies in San Diego at Crystal Image Productions. I've been in the software industry my entire career and have worked at companies such as Aldus/Adobe on the team for Gallery Effects, and Gryphon Software the makers of Morph Software and edutainment software for Disney, Warner Brothers and HBO. I worked at Nik Software for almost 8 years as the Education Project Manager, helping photographers and enthusiasts learn how to make beautiful images during the post-processing phase. Nik Software was acquired by Google a couple years ago and I was one of a handful of people from the San Diego office that was relocated in Mountain View to work with the Google+ Photos Team.

My photography "A-ha!" moment happened on the first day I started working at Nik Software, when Product Manager, Josh Haftel, opened the consignment closet and showed me all the Nikon cameras and lenses I could borrow. He took out the Nikon D2H and put a 24-70mm lens on it. When I looked through the viewfinder, I knew that was what I wanted my world to look like. I've never been the same since!

EEG: Since you worked for Nik Software -- what's your take on post-processing images?

LAR: I have a saying... "Photography is art - whether it is realistic or artistic, it is your vision, what you saw at that moment. You can choose to leave it as is, or enhance it to bring out the feeling of the moment. The choice is yours." - Laurie Rubin

I believe that we should always strive to get-it-right out of the camera the first time, but more times then not, enhancing an image during post-processing will bring out the details and help to recreate what you felt at the moment of capture. By adding a bit of structure, a slight vignette, and a touch of adjustments, that can help to bring out the best in your images. It helps to create your unique look and style and to connect with your viewers. Everyone of my images, I have enhanced, wether it is to reduce noise, add a creative effect or perhaps a bit of selective sharpening.

EEG: I couldn't agree more! Tell us about "Read to your kids," the image that won the Windland Smith Rich International Award and is currently displayed at the Smithsonian Natural History Museum.

LAR: This was a once in a lifetime shot! I just happened to photograph the baby gorilla’s mom holding a magazine as she stopped to look at a photo of her baby (sitting next to her). This was one of the enrichment items that the zookeepers put in their enclosure. I visited the gorillas almost every weekend and each time, there was a new behavior, the light was different, or they had new items to play with. It does take patience, but if you go as soon as the doors open, the animals are most active and you can avoid the crowds.

EEG: All of your work is amazing, but what I love the most are your wildlife images: you are able to capture the most intimate and spontaneous moments between animals, as if you weren't even there, probing with your lens. How do you achieve that, other than, like you said, having a lot of patience?

LAR: Thank you! Yes, photographing animals takes a LOT of patience! But I am often richly rewarded by spending that extra quiet time with them, waiting for a particular behavior and direct eye contact. I don't try to get their attention, but I stay with them and watch and learn. Often times, when I am going out to photograph a particular animal, something else appears before my lens that was totally unexpected. I love it when that happens! I am all about capturing moments and being able to share those with others. There is a connection with animals that I get when I take the time to just "be" in the their presence.

EEG: What suggestions/recommendations do you have to anyone getting started in photography? What about for those who want to branch out into wildlife photography in particular?

LAR: My best advice is to pick up a camera, whatever you have and go out and take pictures. The old saying "Practice Makes Perfect" applies to all genres of photography. You're not going to get better by not making this a consistent exercise in actually making mistakes to find out what works for you. Follow and learn from photographers whose work you admire. We have so many amazing photographers, offering workshops and training online. I've been blessed to have known, learned and photographed alongside some of the best photographers in the world.

Discover what your passion is... and if it is wildlife, make it your mission to get out among the animals with your camera. Watch and learn their behaviors and take a LOT of photos. Share your photos online to see what people like. This helps to take away your personal emotional ties to some of your images. For example, we might like one of our images because we were somewhere special, or it reminds us of who we were with. Try entering some contests, or get published in a magazine or book or get your prints in a gallery.

Most of all... have fun, be in the moment and photograph from your heart, not your head. It will show in your images.

EEG: It certainly shows in your images, Laurie! Thank you for sharing your thoughts with us today and mostly, thank you for sharing the beauty you capture with your lens.

Find more gorgeous images by Laurie on her website, on G+ and on Facebook.

Monday, March 24, 2014

"Surrealism with a touch of humor": how photographer Erik Johansson sees the world

"Cut and Fold" © Erik Johansson

This year I started a new feature on the blog: showcasing the work of new photographers. The thing that amazes me every time I discover a new talent is how young they are. It seems to me that digital photography has given young adults a new means to express themselves, especially when it comes to conceptual photography. If you haven't done so yet, start following Colossal and My Modern Metropolis. Besides discovering lots of new artists you'll be blown away by how many of them are under thirty years of age. Wow!

One of such amazing young talents is Erik Johansson, a Swedish photographer who's now based in Berlin. Erik picked up his first camera at age fifteen and, interestingly, as he says in his bio:
"Being used to drawing it felt quite strange to be done after capturing a photo, it wasn’t the process of creating something in the same way. Having an interest in computers made it a quite natural step to start playing around with the photos and creating something that you couldn’t capture with the camera."
I can totally relate to that! And what Erik creates is not only unique: it's intelligent, mind-blowing and thought-provoking. It's not by chance that Erik's most inspirational artists are Salvdor Dali', René Magritte, and M.C. Escher.

As Erik defines it himself, his style is "surreal with a touch of humor", and it's exactly that "touch of humor" that I find so captivating in his images.

"Cover up" © Erik Johansson

"Fish Island" © Erik Johansson

"Groundbreaking" © Erik Johansson

I asked Erik a few things about his artist statement and his background. Here are his answers.

EJ: I don’t capture moments, I capture ideas. To me photography is just a way to collect material to realize the ideas in my mind. I get inspired by things around me in my daily life and all kinds of things I see. Although one photo can consist of hundreds of layers, I always want it to look like it could have been captured. Every new project is a new challenge and my goal is to realize it as realistic as possible.

EEG: Most photographers emphasize "in camera" work, meaning that the more you manage to accomplish with the camera, the less time you need to spend post-processing. Looking at the many "behind-the-scene" videos on your website, it seems that you "embrace" the post-processing work. How long does it usually take to realize one photo from idea to final piece?

EJ: It can take anything from a few weeks to several months. Some ideas require even longer time as it’s hard to find the perfect spot to shoot, or maybe it’s the wrong season.

I’ve always had a big interest for both drawing and computers. I think that is one if the reasons why it was a natural step for me to modify the photos in the computer. Photography and retouch always felt more like a hobby so I choose the engineering path instead. As I finished my studies in 2010 I already worked part time as a freelance doing work for some advertisement agencies in Sweden. Although I still find interaction design a very interesting subject, photography and retouch is my passion and what I love. That made me become a full-time photographer/retoucher when I graduated.

EEG: I also come from a drawing background and I can relate with the feeling that a single snapshot is not satisfying -- creating an image is where the fun begins, no matter how challenging. What's the most challenging image you've made and did you ever feel like giving up in the middle of the process?

EJ: Every new image is a new challenge. a I always try to create new and more complicated photos. Sure, I feel like giving up sometimes, then it's just good to leave it for a while.

EEG: You shoot a Canon 5D mk2 and a Hasselblad H5D, a 40 mega-pixel camera with a huge sensor! While I can totally relate to shooting with a 5D mk2, I can't even begin to imagine what it is like to shoot a Hasselblad (yes, I'm drooling here). Can you tell me a bit about that, i.e. what projects do you use the canon for and what the Hasselblad?

EJ: Well, it's a heavy and slow camera, but on a tripod it captures amazing details. It hasn't really changed the way I work that much more than I get even more details in the photos. It's a great camera but it's not really that much about the equipment. It's about what you can imagine!

EEG: And one last question: if you could speak to Escher in person, what would you tell him? :-)  (I think he'd be very proud of you!)

EJ: He was a great artist and big inspiration, I think I would like to talk to him about how geometrics and mathematics goes hand in hand with art.

EEG: Yes, that would be fun, for sure.

I leave you with the Behind-the-Scenes video of how Erik made "Cut and Fold", the picture at the top of the post. Amazing, right?


Monday, March 10, 2014

Outline or not? Planned photo shooting or not?

Time Forward, © EEG

Outgrown Dreams, © EEG

As a scientist, I love rigor. Experiments need to be planned, analyses need to be outlined, all statements in the paper need to be justified with evidence. Yet when it comes to writing or shooting I do zero planning. I don't outline, I don't sketch images.

My stories start with a voice. Characters come first, then settings. I get to know my characters as they form in my head. I don't know what they want, I don't know what they'll do. I put them in some awkward situation and go from there. I can't plan, because I don't know what's going to happen next. If you've read my stories, you know that I always have some scientific concept revolving behind the scenes. That's where I get my inspiration. I read about some new concept that's just been discovered and I think, "What if ... ?" And that becomes the conflict in my story.

Shooting's pretty much the same. Many photographers out there are not too fond of post-processing. They plan their shootings carefully so that they can spend the least amount of time post-processing. I LOVE post-processing. If I shoot an image that's ready I have no fun. I want to create the image, not just shoot it. So I'll take ten different images and combine them together. Sometimes I only have one piece of an object I want to use and I'll fiddle with it until I can reconstruct the rest. My images aren't perfect because of that. And yet I love them because of that, because of the hours I spend on the computer watching them grow, one layer at the time. I also use Photoshop Elements instead of the more sophisticated (and way more expensive!) CC6 because again, I don't want software that does stuff for me. I want to do it myself.

What about you? What kind of writer/shooter are you?

Waiting for the Rain, © EEG

Monday, March 3, 2014

Time Series

No, not the mathematical ones :-)

I've been working on a new series, themed around the concept of "Time."

I just uploaded it to My Gallery, hope you'll enjoy it.

Time V © Elena E. Giorgi

Time I © Elena E. Giorgi

Time II © Elena E. Giorgi

Time III © Elena E. Giorgi


Saturday, March 1, 2014

East meets West in Reylia Slaby's ethereal images

"They called her Ame Onna" - © Reylia Slaby
Today I'm excited to introduce a new feature on CHIMERAS: along with writer interviews, I'm starting a new series of interviews with photographers. And it is my great honor to have as my very first guest, the beautiful and extremely talented photographer Reylia Slaby. This is how Reylia introduces herself in her own words:
"I'm Reylia, and I'm a conceptual photographer, but that isn't all I think I am. I am also a graphite artist, a poet, a dancer, a model, a writer and a reader. Not because I do all of those equally as much, or that I'm spectacular at any of them, but because I love them all equally, and have all had their place in my life."
I think I can relate to those words. :-)

I came across Reylia's photography page on Facebook and I was instantly blown away. There are many conceptual photographers out there, yet Reylia's work stands out for its freshness and uniqueness. Blending together both western and eastern elements, her images are magical and evocative. How does she achieve that? By "filling them with emotion," as Reylia herself explains in her artist statement:
"In my photos I must have emotion, and I must have feeling. That is all I strive for. I get my inspiration from what I believe to be truths in life. If I can bring to people images they only see in their dreams, and images filled with whimsical hope, beauty, or tragedy, then that is a wonderful gift. And I hope that in that way I can be a friend."

EEG: Thanks so much, Reylia, for answering my questions today! Your work is amazing, and so is your story: you started as a graphite pencil artist before transitioning to photography (you can see some of Reylia's drawings here). And you've been modeling since you were two, which is not surprising, actually, given how beautiful you are! How did this affect you growing up? When did you transition to the other side of the camera and what motivated you to do so?

RS: Thank you! Yes I have! When I was a kid it was a ton of fun, but since I'm a bit short there aren't too many opportunities in modeling for me at present.

Though since I was home-schooled, growing up modeling actually helped me connect with hundreds of people I wouldn't have otherwiseーplus it exposed me to the photography world quite early on. It might sound unusual, but the most valuable lesson it taught be was how to properly deal with rejection. It has been an invaluable skill, because it helps me keep moving forward instead of dwelling on the negative.

EEG: Though your family is originally from America, you were born and raised in Japan. Indeed, one of the things I love the most in your work is the mix of Asian and Western elements -- I had been playing with cheongsams and sun umbrellas for a little bit before stumbling into your work and when I did, I was blown away. "They Called Her Ame Onna" (the picture above, Reylia explains the story behind it in this post) and "It Can't Protect you" are two of my favorite from your Conceptual gallery. How do you achieve such perfect blend of Asian and Western? What do you love best of each world?

RS: Growing up as a "third culture child" helped me understand that there is more than one way of thinking. These days, I'm actually leaning more towards Japanese styled art because I understand it and it takes up so much of my identity.

I started out with a more "Westernised" style. People have even told me that it looks Victorian, which is funny, because I grew up loving and studying that era. But what I love the most about Japan is the depth and emotion in the culture. I'm extremely grateful to have been born into such a beautiful world.

EEG: I loved your blog post Preparation, on how you learned how to plan ahead for your shoots. But do you ever start off with a certain idea and end up with a completely different one? How often do you surprise yourself?

RS: Yes! It actually happens quite frequently. Instead of going for a particular look, I try to aim for a certain feeling, so my pictures often turn out quite different that I see it in my mind's eye. There are many times where I would have a photo-shoot and I'd end up forgetting the first idea and shoot something completely different. I think the biggest surprised with my piece called "The Captain's Daughter". After that shoot, I couldn't see a story in the pictures, so the original files for that had been sitting on my computer for at least 4 months. Then one day I reviewed them again and saw something different.

EEG: Given that you were (still are?) a model yourself, does it make it harder or easier to work with models?

That's a tough one! I actually don't think it has much to do with your ability to model, but the attitude and imagination of the model. Of course it's always wonderful to have someone who has modeled for a long time or someone who dances (I love to photograph dancers) but it isn't a necessary qualification. A person who can move, who is flexible, who doesn't mind going into cold or dirty waters is the best kind of model! Someone brave enough and believes in the idea enough to continue through.

Thank you so much for the interview!!

EEG: Thank you, Reylia, for kindly answering my questions. It's been a great honor to have you here on the blog and to learn a bit more about you and your work.

I hope you enjoyed getting to know Reylia and her work as much as I did. You can see all of her beautiful images on her website, and learn more about her work process on her blog.